Camera Input InformationIf you haven't already, see important information about the head unit's camera input on this page, especially the section "Test your camera before installing!" These instructions detail how to add my custom RCA cable to the vacant camera pins on the factory 16-pin harness. I also offer "plug-and-play" 16-pin camera harnesses. Head Unit's 16-pin camera socketThis drawing is oriented looking at the 16-pin socket on the rear of the HU, or the rear (wires side) of the car's factory 16-pin harness plug:
The pin numbers run:
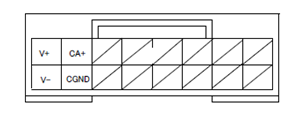
Pin-out of HU's 16-pin rear camera socket:
The HU connects the CGND pin to ground internally. You do not need to connect anything to this pin for the rear camera feature to work. You can use it to provide ground (along with the +6V pin) to a camera that has its power and ground leads at the HU end of its long cable. You may also use the 6V and CGND pins for a relay (details about that later). Picture of rear of Impreza's factory 16-pin harness:
The GRAY wire is the parking brake signal (color is VIOLET/RED in Foresters, RED in some Toyotas). Impreza/WRX/STI models have an extra wire looped between pins 4 and 5 (YELLOW wires in picture) which Forester, BRZ, FR-S, and GT86 do not have. I don't currently know the purpose of that wire. Add Wires to Factory Harness PlugSee this guide for instructions on how to open a retaining latch on the bottom of the factory 16-pin plug (section "Open retention latch"), and how to insert a new wire ("Inserting a wire"). Insert my YELLOW camera RCA cable as follows:
If you also ordered wires for the +6V and CGND pins, insert those in pins 7 and 15, respectively. Double-check the pin position before inserting! Although it's possible to extract a pin, it can be difficult. It's much better to get it right the first time! When all of the new pins are fully seated, you'll be able to close the retention latch on the bottom. Once you have completed the additions to your factory 16-pin harness plug, see this page for additional instructions and tips.
© Copyright 2013–2014 by David Carter. All rights reserved. |