Overview
These instructions apply to many of the multi-pin connectors used to plug into recent factory head units, as well as the harnesses for some aftermarket HUs.
Open retention latch
Before you can insert or remove wires, you must first open a retaining latch on the bottom or top of the harness connector shell. Use a tiny flat-blade screwdriver (like one for eyeglasses) as a lever.
Close-up of a typical shell, shown with the latch already open:
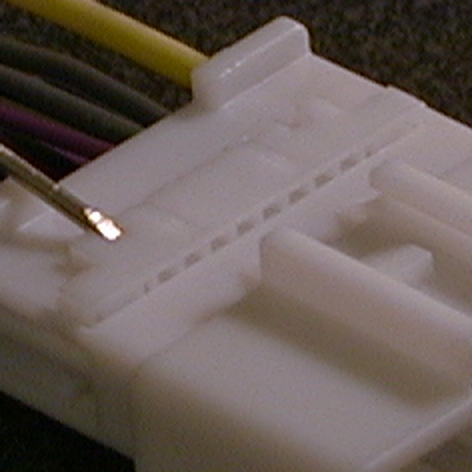 |
Note there are tiny square slots on the back edge of the latch where you can insert the screwdriver (the picture shows the tip of the screwdriver in one of the slots). Smaller shells will only have one slot. Larger shells have 2 or 3. Pry the latch to the open position.
The latch will only pop up about 1 mm. Do not try to remove it completely! The cross-section of the latch is shaped like a harmonica, with each terminal passing through one of the holes. If you try to force the latch open too far, you will damage the terminals.
If the latch is difficult to move, you can also carefully pry it up via holes on the left and right sides of the shell. Do not poke your screwdriver too deep into the side holes, or you could damage the outer terminals.
Once the latch is open, the shell or terminal still has spring clips that hold the terminals (so they won't fall out).
Pin holes
If you look closely at each of the pin openings on the rear of the shell, you'll see they're keyed (shaped like the letter "P" or "q" for shells with the latch on the bottom, or "b" for shells with the latch on the top). The contact terminal has a tiny fin that you need to orient pointed down or up (towards the latch) to fit into the opening.
Inserting a wire
Double-check the pin position before inserting! Although it's possible to extract a terminal, it can be difficult. It's much better to get it right the first time!
Insert the wire until the terminal snaps in (you will hear and feel a faint "click"). Approximately 5 mm of wire will follow the terminal into the hole before it finally clicks in.
Remember the contact terminal has a tiny fin that you need to orient pointed properly to fit in the hole.
The back of the terminal (where it crimps the insulation) may be snug going in. You might need to "tuck" the edge of the wire's insulation into the shell's hole to get it started.
You will also need to hold the wire very close (within a couple of millimeters) of the back of the shell, and push it in 1 or 2 mm at a time. You can use small needle-nose pliers to help (take care not to crush the wire).
You'll be able to close the retention latch once all of the new terminals are fully inserted.
Extracting a wire
There are two styles of plastic plugs with receptacle terminals. Each style requires a different procedure to extract wires. You can identify the shell's type by looking at the front. This picture shows two 24-pin plugs side-by-side:
 |
| (click to see larger image) |
Both plugs have identical outer dimensions, and the smaller square pin holes are in the same relative positions. So both styles will fit the same type of socket on the back of a head unit.
The opposite gender shells (female housing with male terminals) are usually type "B".
Extraction — Type "A" Shell
This style of plastic shell is mostly used for factory harnesses — those built by the carmaker. I haven't seen these used on aftermarket harnesses.
The shell has a tiny plastic spring clip that holds each terminal. The springs are visible in the above picture (shell type "A"), inside the larger opening above each pin hole. The spring clip is nearly as wide as the large hole.
You will need to swing the clip up out of a notch on the nose of the metal terminal. That will release the terminal so you can pull the wire out the rear of the shell.
This drawing shows a cross-section of the plastic shell. The wire is colored green, and the terminal gold. In drawing detail "A," the spring clip (colored blue) is depressed into the top of the terminal:
 |
| (click to see larger image) |
You'll use a tiny screwdriver (yellow) to catch a ridge on the front edge of the spring clip and lift up the spring.
Extraction Procedure (shell type "A")
You may want the help of a second person to tug on the wire (after you've lifted the plastic spring clip).
- If you haven't already, open the retaining latch (see instructions above).
- Hold the connector shell tightly by the sides, to avoid pushing in the retention latch on the bottom.
- Push the wire into the plug slightly. This will take pressure off of the spring clip (drawing detail "A").
- Use a tiny flat-blade screwdriver (like one for eyeglasses) as a lever. Your screwdriver needs to be very small, with a straight, chisel-shaped tip (not rounded, bent, or worn). Insert the tip of the screwdriver into the front of the shell, into the larger hole that is above the terminal you wish to remove. Do not insert anything into the smaller square hole.
- Angle the tip of the screwdriver down slightly, so that it slides along the top of the metal terminal. Insert it just far enough to catch the tip of the plastic spring clip. Keep a little bit of inward pressure on the screwdriver (but not excessive).
- Now swing the spring clip up. Do not use the plastic shell as your fulcrum — use your thumb and fingers to apply the upward force on the screwdriver.
- Listen and feel for the spring to click closed — it's easy for it to slip past the screwdriver. If that happens, carefully try again.
- The plastic spring clip doesn't need to swing up very far — it probably moves less than 0.5 mm or 1/32" (drawing detail "B").
- When a terminal is unlocked, you should be able to pull the wire without much effort (drawing detail "C").
If you start to damage the plastic spring clip that holds the terminal, you'll have to give up on this approach. Your only alternative will be to cut the factory wire and solder or crimp onto the stub that goes into the connector. Keep that in mind when you decide where to cut the wire — make the stub long enough to work with.
When you're finished extracting and inserting wires, remember to close the retention latch on the bottom of the shell. If you forget to do that, you will not be able to insert the plug into the head unit's socket.
Extraction — Type "B" Shell
This style of plastic shell is used mostly for aftermarket harnesses. I've also seen them on OEM accessories (e.g., add-on subwoofers, navigation modules, etc.).
Each terminal has a tiny metal spring clip which latches the terminal into the plastic shell. To release the spring clip, you will need to find or fabricate an extraction tool. This picture shows the spring on a receptacle terminal, with a drawing of an extraction tool:
 |
| (click to see larger image) |
You'll need the tool to have a portion long enough for you to hold onto, with a tip that is just small enough to fit into the shell's pin extraction hole. In this picture, the extraction hole is circled:
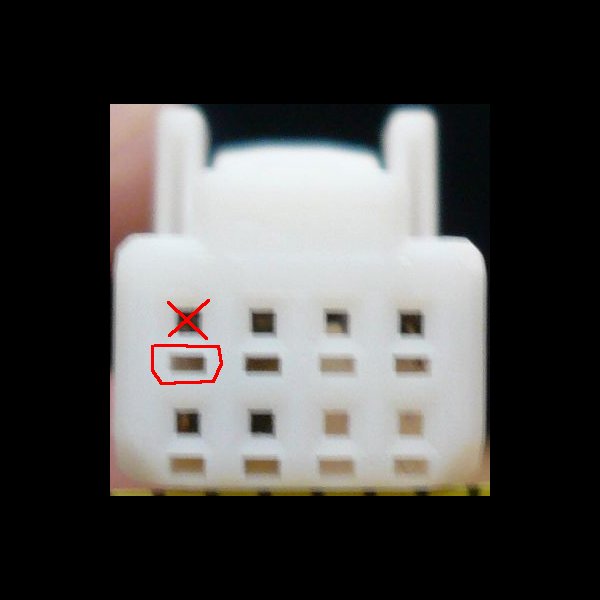 |
The tip must be approximately 1 mm wide by 0.5 mm tall, and 6 mm long. The end should not be very sharp (otherwise it could simply poke into the plastic of the shell).
Making An Extraction Tool
Some people have used a large staple (not from a normal desk stapler, but the next larger size). However, those don't give you much to hold onto, and tend to draw blood.
Someone suggested the eye end of a sewing needle. I tried a small one, but it was just a little too thick vertically. Flattening the end with a hammer might have helped. You would also need to modify the sharp end — cut off the point, and bend it so you have something to push without impaling your finger.
I've had success by modifying a straight pin. Cut off the pointy tip with sharp wire cutters. Then flatten the tip by hitting a few times with a hammer (with a smooth-face) onto a hard, smooth surface (an anvil is ideal — some bench vices have a smooth anvil area on the back). Alternatively, you might be able to compress the tip in a bench vise that has smooth jaws. Continue flattening the tip until the last 6 mm portion is thin enough (top to bottom) to easily fit into the extraction hole. If the tip is too wide (left to right), file it so it will just fit into the extraction hole. Also use the file to dull the front, and remove any sharp edges or burs. Finally, straighten the entire pin, if it's become curled.
Extraction Procedure (shell type "B")
You may want the help of a second person to tug on the wire (after you've opened the plastic spring clip).
- If you haven't already, open the retaining latch (see instructions above).
- Hold the connector shell tightly by the sides, to avoid pushing in the retention latch on the bottom.
- Push the wire into the plug slightly. This will take pressure off of the metal spring clip.
- Push your extraction tool into the extraction hole (the rectangular hole below the terminal you wish to remove). Do not insert anything into the square hole (marked with an X in the above picture).
- Just at the point where you've inserted the tool 6 mm, you should feel and hear a faint click. That is the tip of the tool pushing down on the spring clip.
- Maintain a slight pressure pushing the extraction tool into the hole. You should then be able to tug on the wire to remove it.
If the wire won't budge and you're starting to pull more than gently, back off the extraction tool by 1 or 2 mm and try again.
I recommend not using needle-nose pliers to pull a wire. Using your bare fingers will let you feel how much tension you're exerting, so you'll know when to stop. With pliers, it's also too easy to crush the wires, which are 20 gauge or smaller.
When you're finished extracting and inserting wires, remember to close the retention latch on the bottom or top of the shell. If you forget to do that on a plug, you will not be able to insert the plug into the head unit's socket.